
For those who follow my Instagram account, you may have seen the progress of my latest craft project.
50 years ago today, July 16th 1969, three earthlings lifted off from Cape Canaveral in Florida to begin their journey to the Moon. 4 days later, Neil Armstrong took the first step onto the lunar surface.
To celebrate and commemorate this event, I’ve spent the month of June and July recreating one of the artifacts from the Lunar landing.
The Beginning
Back in 2015(!) the Smithsonian created the Kickstart project, Reboot the Suit, to raise fund to “conserve, digitize, and display Neil Armstrong’s and Alan Shepard’s spacesuits.”
It raised more than $700k which enabled the Neil Armstrong’s lunar spacesuit to be displayed on July 16th, 2019!
As a project backer, I received a 3D printing digital file of the spacesuit glove which I promptly put aside and forgot. At that time I did not have access to a 3D printer nor felt the need to purchase one for this one-off project.
However, when we moved cross-country to California last year, I joined productOps which has a Raise3D Pro2 printer.
As May this year came around, I suddenly realized that I now have the tool and, perhaps, the skills to do justice to Neil Armstrong’s glove.
The Printing
Fortunately for me, the 3D file is in a ready-to-print format (STL). So I loaded it into ideaMaker software and seek advice from one of my co-worker who has more experience with the Raise3D printer. (The last time I operated a 3D printer, it was in the semi-dark ages with the MakerBot Replicator using ABS!)

My co-worker suggested a few setting changes and we started a test print which consisted of just the bottom few centimeters of the glove. This let us verify that the base moved while printing and the supports were adequate.
The first test print of the bottom part showed that we need to include a raft and larger supports, and the second test print came out good. So we proceeded with printing the bottom half of the glove, upside down! This is because the dividing cut between the top and bottom halves is prefectly level so we won’t need tiny amount of support material.
(The 3D files came in 2 parts as most 3D printers don’t have the print volume to print the whole glove in single pass)
The bottom half

It took just under 24 hours to print the bottom part. Fortunately, Raise3D Pro has remote web cam so I could check-in on the progress even from home in the evening.
Removing the raft and support turned out to be more difficult than I envisioned. The raft formed strong link to the printed part even though it shouldn’t so it took me over 2 hours of using cutter and plier to remove them bit by bit.
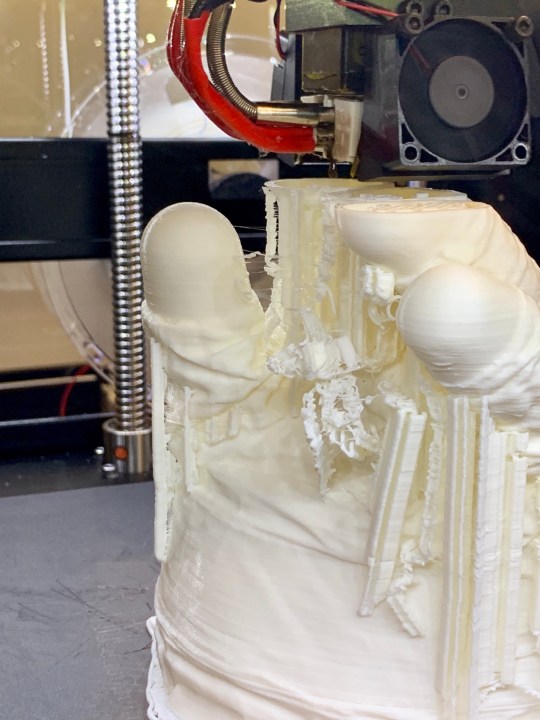
The top half
With the bottom half under our belt and the top half requiring a lot more supports (due to its more complicated shape), we knew we would need to tweak some of the print settings before embarking on the full print.

It took 3 test prints before I was happy with the settings. The support was too narrow at 2mm, then still a little narrow at 2.5mm, and finally at 3mm I felt they would print consistently.
One of the nice features in ideaMaker is the ability to add supports automatically. It generally works well but there are a few places where I needed a few extra supports. So I manually added additional supports for those parts. To be honest I don’t think they made any difference but better safe than sorry, especially given that this took just over 24 hours to print.
The Preparation
Gluing the two halves
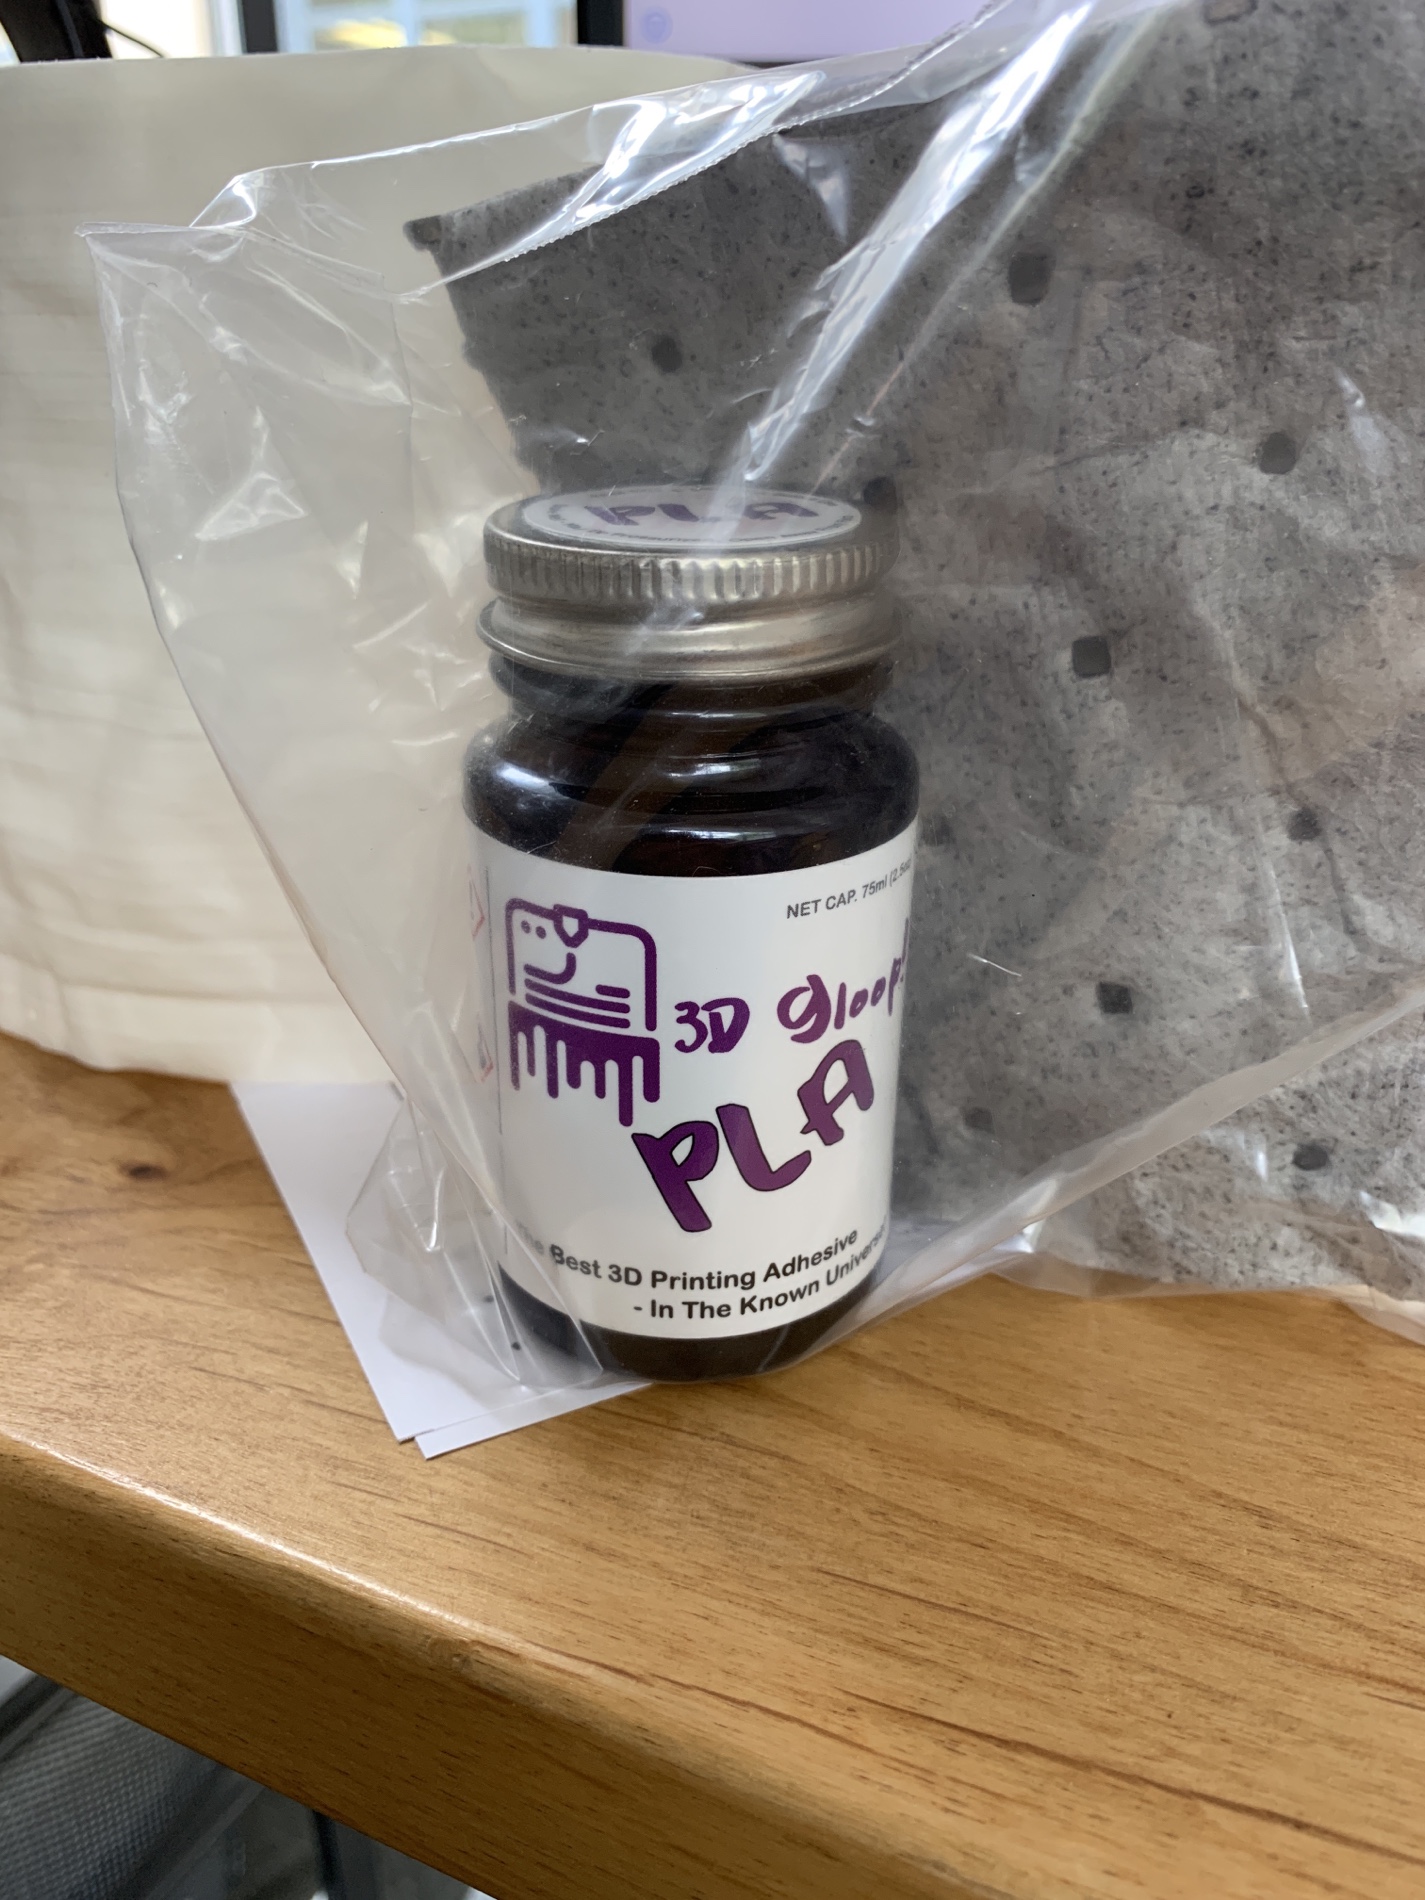
There are a few options to glue two PLA parts together. The obvious choice is plain-old superglue but I was looking for a better alternative. After being directed to watch one of the episode of 3D Printing Nerd video no YouTube, the answer seems to be 3D Gloop!.
But before any gluing can be done, I spent a few hours clearing away the 3D printing raft and support, and sanding the surfaces of the two halves where they join so they would be as flat as possible.

The actual gluing was very straightforward. I applied small amount of glue on both surfaces, put them together and aligned them quickly (the glue forms a weak bond within seconds). Put pressure from both parts for a few minutes and done! I let it cure for a day before the next step.
Sanding
I gave the whole surface a general sanding using 220 grit sand paper. The white filament led me to believe that the surface was smoother than it actually was so I moved on to filling the join areas and fingertips with putty.
Filling (the first time)
The interweb suggests Bondo putty for filling so I went onto Amazon and searched for some. The top result is the 801 Professional Glazing and Spot Putty. It is a 2-parts putty which means you will need to mix two compounds to create the putty. I decided that I didn’t really need the extra complication so I found the 1 part version, 651 Glazing and Spot Putty, in my local hardware store.
The putty dried relatively quickly. It changed from free flowing paste to molasses-like substance within seconds. So I had to work fast to spread and shaped the putty. My attention was mainly on getting a smooth joins between the two halves.

Once the putty dried, I used 400 grit sand paper to remove all the excess material as well as gently shaping them to blend in with the surrounding.
Priming
I rely on the 3D printing community for information about how to paint and finish a print. Rust-Oleum 2 in 1 Filler and Sandable Primer seems to be the favorite. It comes in dark-is grey which has advantages and disadvantages.
At this point of the build, my expectation was that I would move onto painting as soon as the primer was on. A surprise awaited me after I sprayed the glove with the first layer of primer.

I did not realize how noticeable the print layers would be until the primer was on. The white filament hid a lot of the print layers from visual inspection and this was when I realized how much more work was ahead of me at this stage.
More filling and sanding
To take the quality of the surface finish to the next level, I gave the whole surface a good amount of sanding, using 400 grit with water. But there were a lot of crevices and folds where the 3D printer doesn’t have the resolution to lay down adequate material for smooth surface. The sanding helped some but a few of them required filling.
The fingertips received special attention since I wanted a really smooth finish. I practically covered the whole tips with thin layer of putty, then wet sand them to the smoothness I want.
Once I was generally satisfied with the finish, I applied one more layer of primer and a gentle wet sanding before moving onto painting.


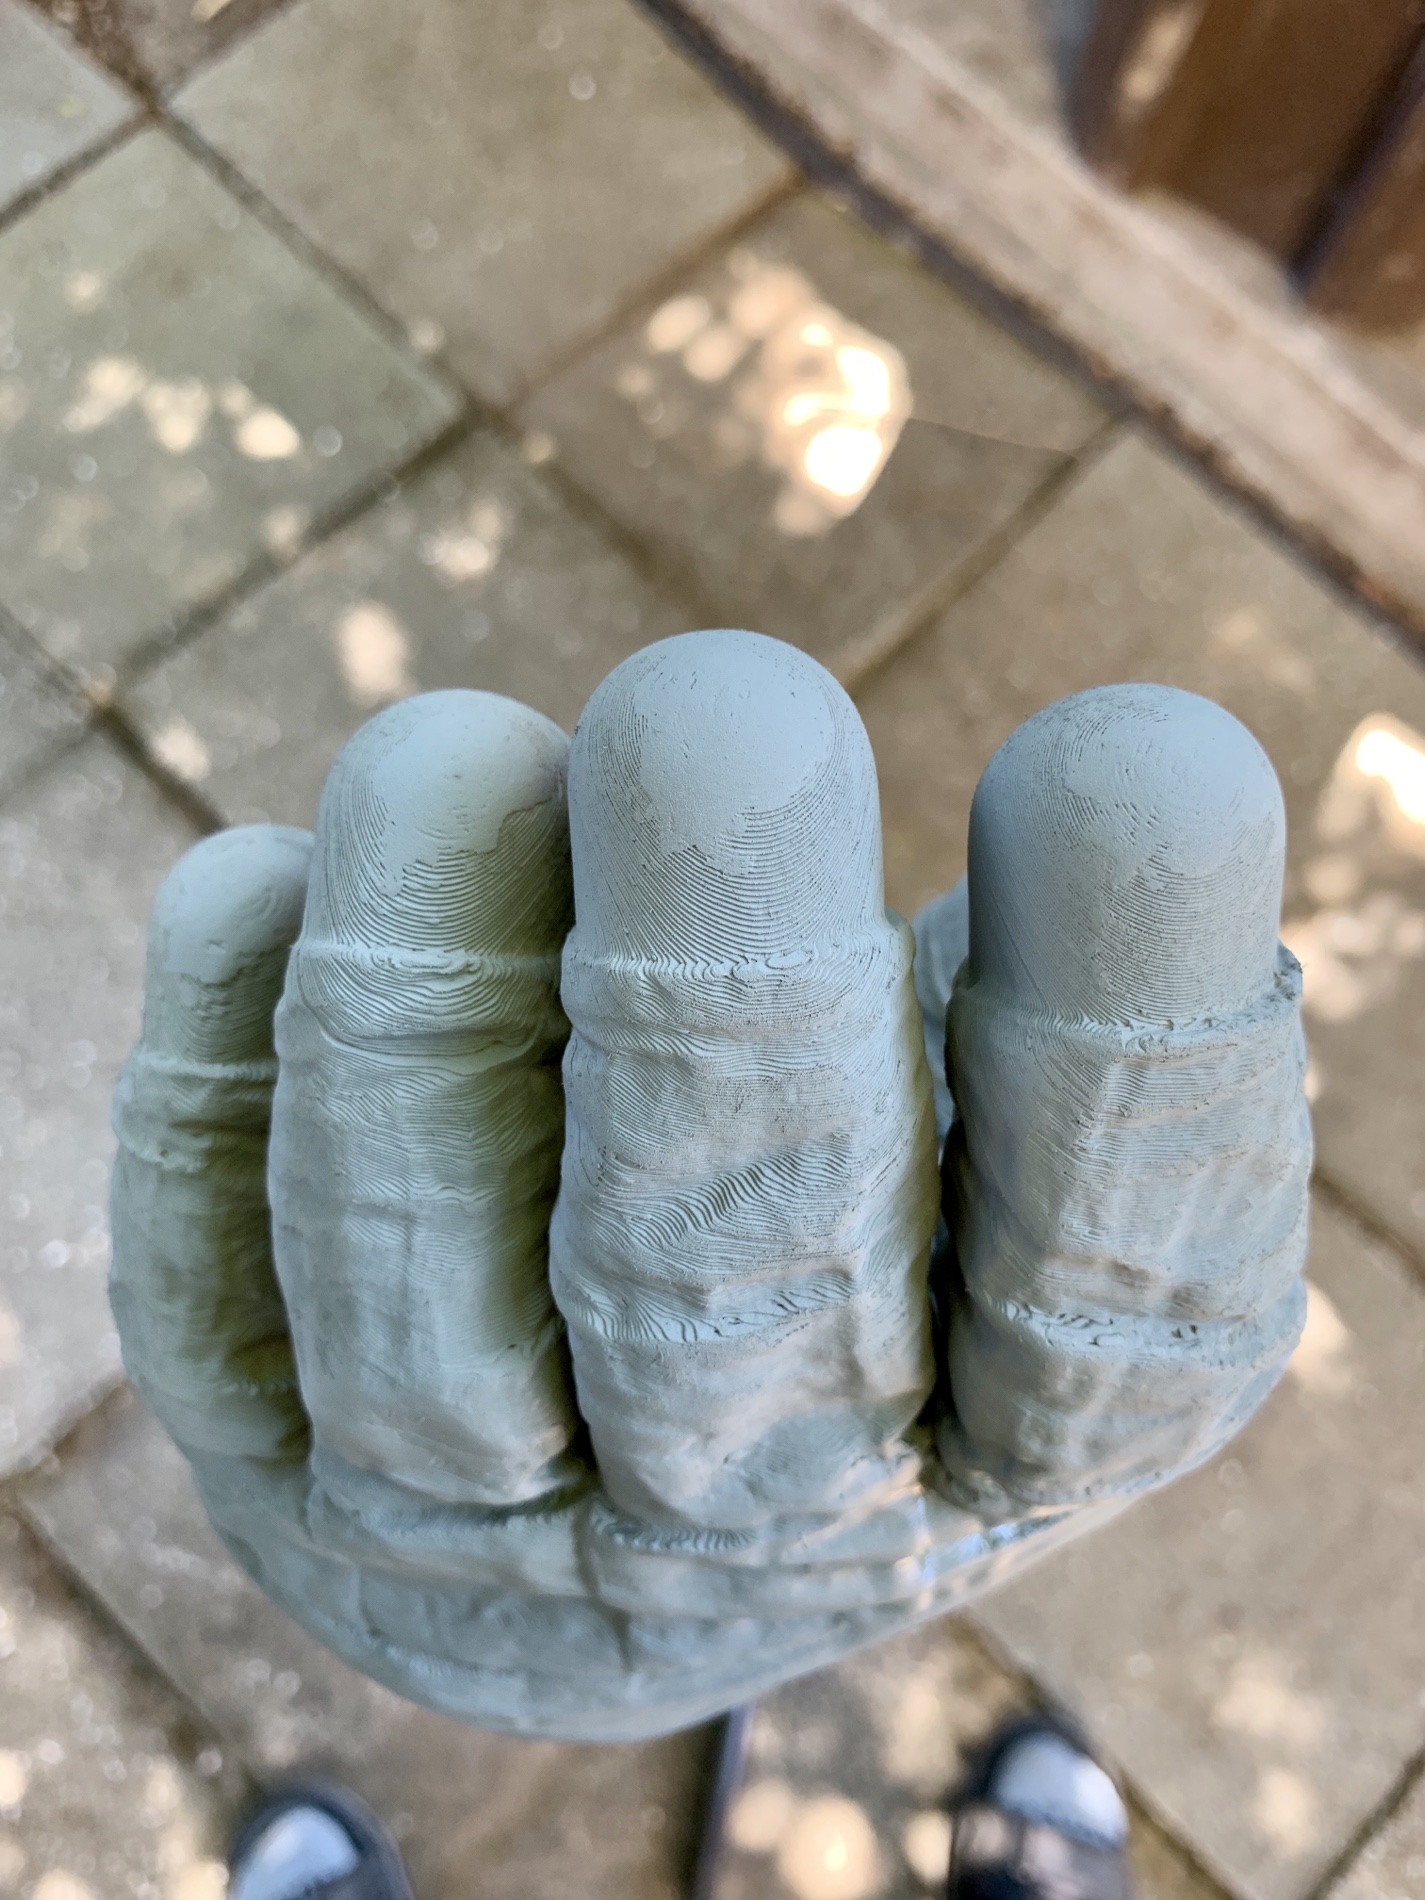
Some of the support material can still be seen on the surface at this point
As the final preparation step, I wet sanded the whole glove with 600 grit.
The Painting
Ideally I’d love to use an airbrush with compressor and mix my own paints in order to get as closely matched colors as possible. However I don’t currently own an airbrush/compressor set and since this is an one-off project, spray can paints were the pragmatic choice.
For the lower glove and upper glove, I chose Montana Cans GOLD spray paint and varnish for their quality and availability.
For the rubberized fingertips, I decided to mix acrylic paints to match the color from reference photos from the Smithsonian.

The Lower Glove
The first coat of the white paint went on easily. The Montana Cans produces a fine, low pressure mist and so I needed multiple passes to ensure good coverage. The benefit was that it was actually difficult to use too much paint. Since I painted outdoor, pollen/dirt from the wind landed on the surface while it stood drying. Thus I had to wait for the paint to be “working dry” (i.e. ~60 min drying time) before I could use 600 grit sand paper to remove those imperfections.

It was at this point that I noticed there were a few patches where the painted surface remained rough and wouldn’t take on the paint finish like the rest. I’m not sure whether that was caused by the sanding (or lack thereof) or some other reason.
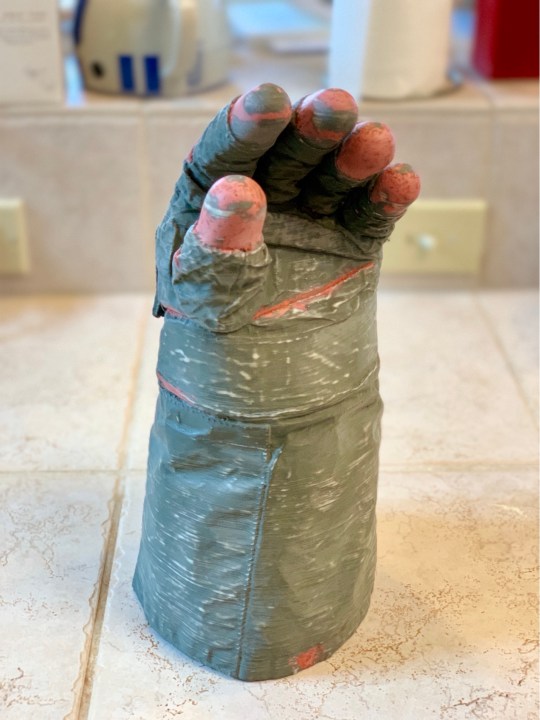
While the result was generally good, I was not 100% satisfy because the 3D print layers were still fairly visible. So I made an on-the-spot decision to paint on the thread marks as a way to divert attention from the print layers.
The thread marks were hand painted using a Princeton Artist Brush Heritage series 0/2 round brush. It took over about an hour and they do work as a distraction! I am not happy with the quality due to my own poor hand painting skill, but I had to accept it and moved on as by this time I only had 4 more days till my self-imposed deadline.
I finished the lower part with a semi-gloss vanish, also from Montana Cans. It was more glossy than I wanted. What I was looking for is closer to semi-matte but semi-gloss is my only choice. Perhaps the matte varnish will look better?

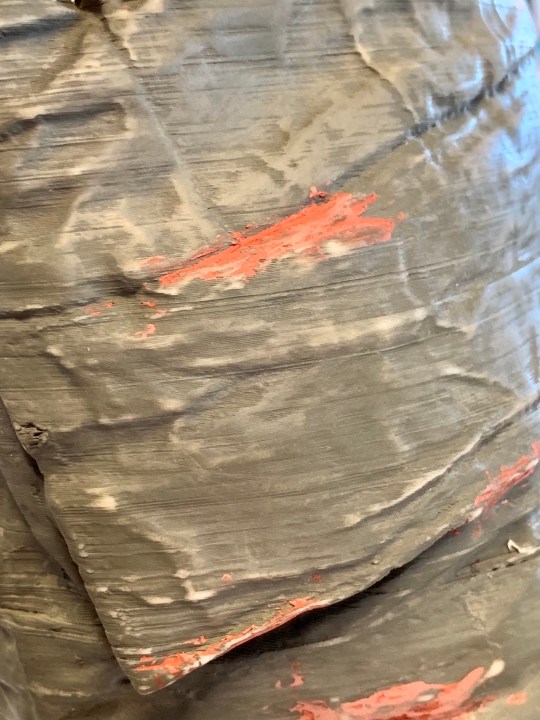
Hand painted threads 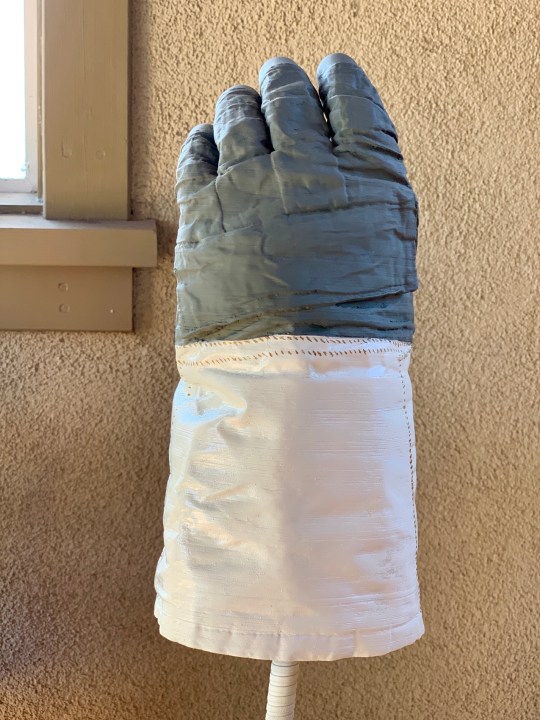
Hand painted threads
The Upper Glove
For the upper glove, the reference photos show that the material has a metallic sheen so I decided to use a mixture of grey paint (“Stealth”) and metallic grey (“Metallic Graphit”) to simulate that effect. Then a gloss vanish to provide the contrast against the semi-gloss of the white part.
I applied 2 layers of the Stealth first to ensure good coverage since the primer is also grey and it was difficult to see if I missed some spots or not.
Then I applied a very light coat of the metallic grey, holding the can further from the glove. Literally more of a dusting than spraying. This created a subtle metallic effect that doesn’t shout metallic but is still noticeable.
I’m highly impressed by Montana’s gloss vanish. After two coats the glove has a very glossy finish but not so overly glossy that it would be mistaken as plastic.


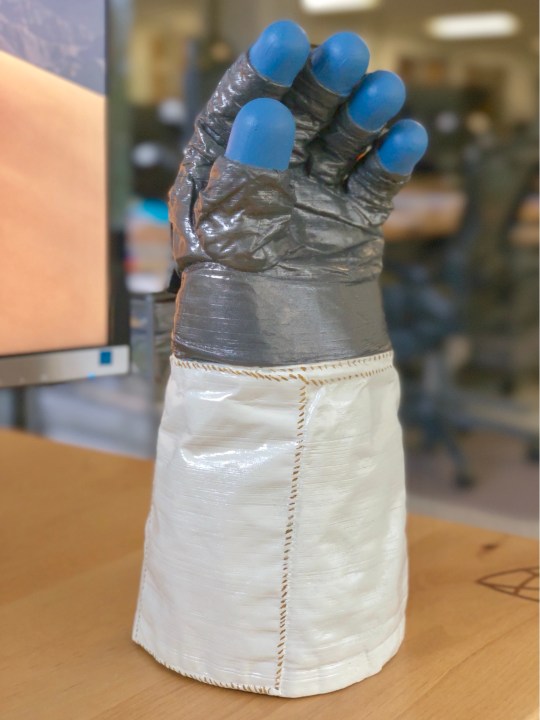
The (F-ing) Fingertips
After looking around the web there doesn’t seem to be any documentation about the correct color for the fingertips. All I have is photos from the Smithsonian’s update in the Kickstarter project as reference. After a fair amount of guessing and going back-and-forth in the local art supply shop, I ended up with a combination of grayish blue and manganese blue phth paints.

I mixed a test sample first with ~80% grayish blue and 20% manganese blue and it looked reasonable. So I proceeded with mixing a larger batch for painting with a small/medium size brush. After applying a reasonably thick layer, I left it to dry for about 3 hours before I foolishly attempted to sand down the brush strokes. I soaked a 600 grit sandpaper and started sanding very lightly, starting with the thumb. With some success I proceeded with the other fingertips but the water must have rehydrated the paint and I was left with a few patches of chipped paint. I had no option but mixed another batch of paint and applied over all the fingertips, and that was the end of that (for now). 😔
The result looked reasonably close but I think less manganese blue and may be a touch of light purple and white will help.
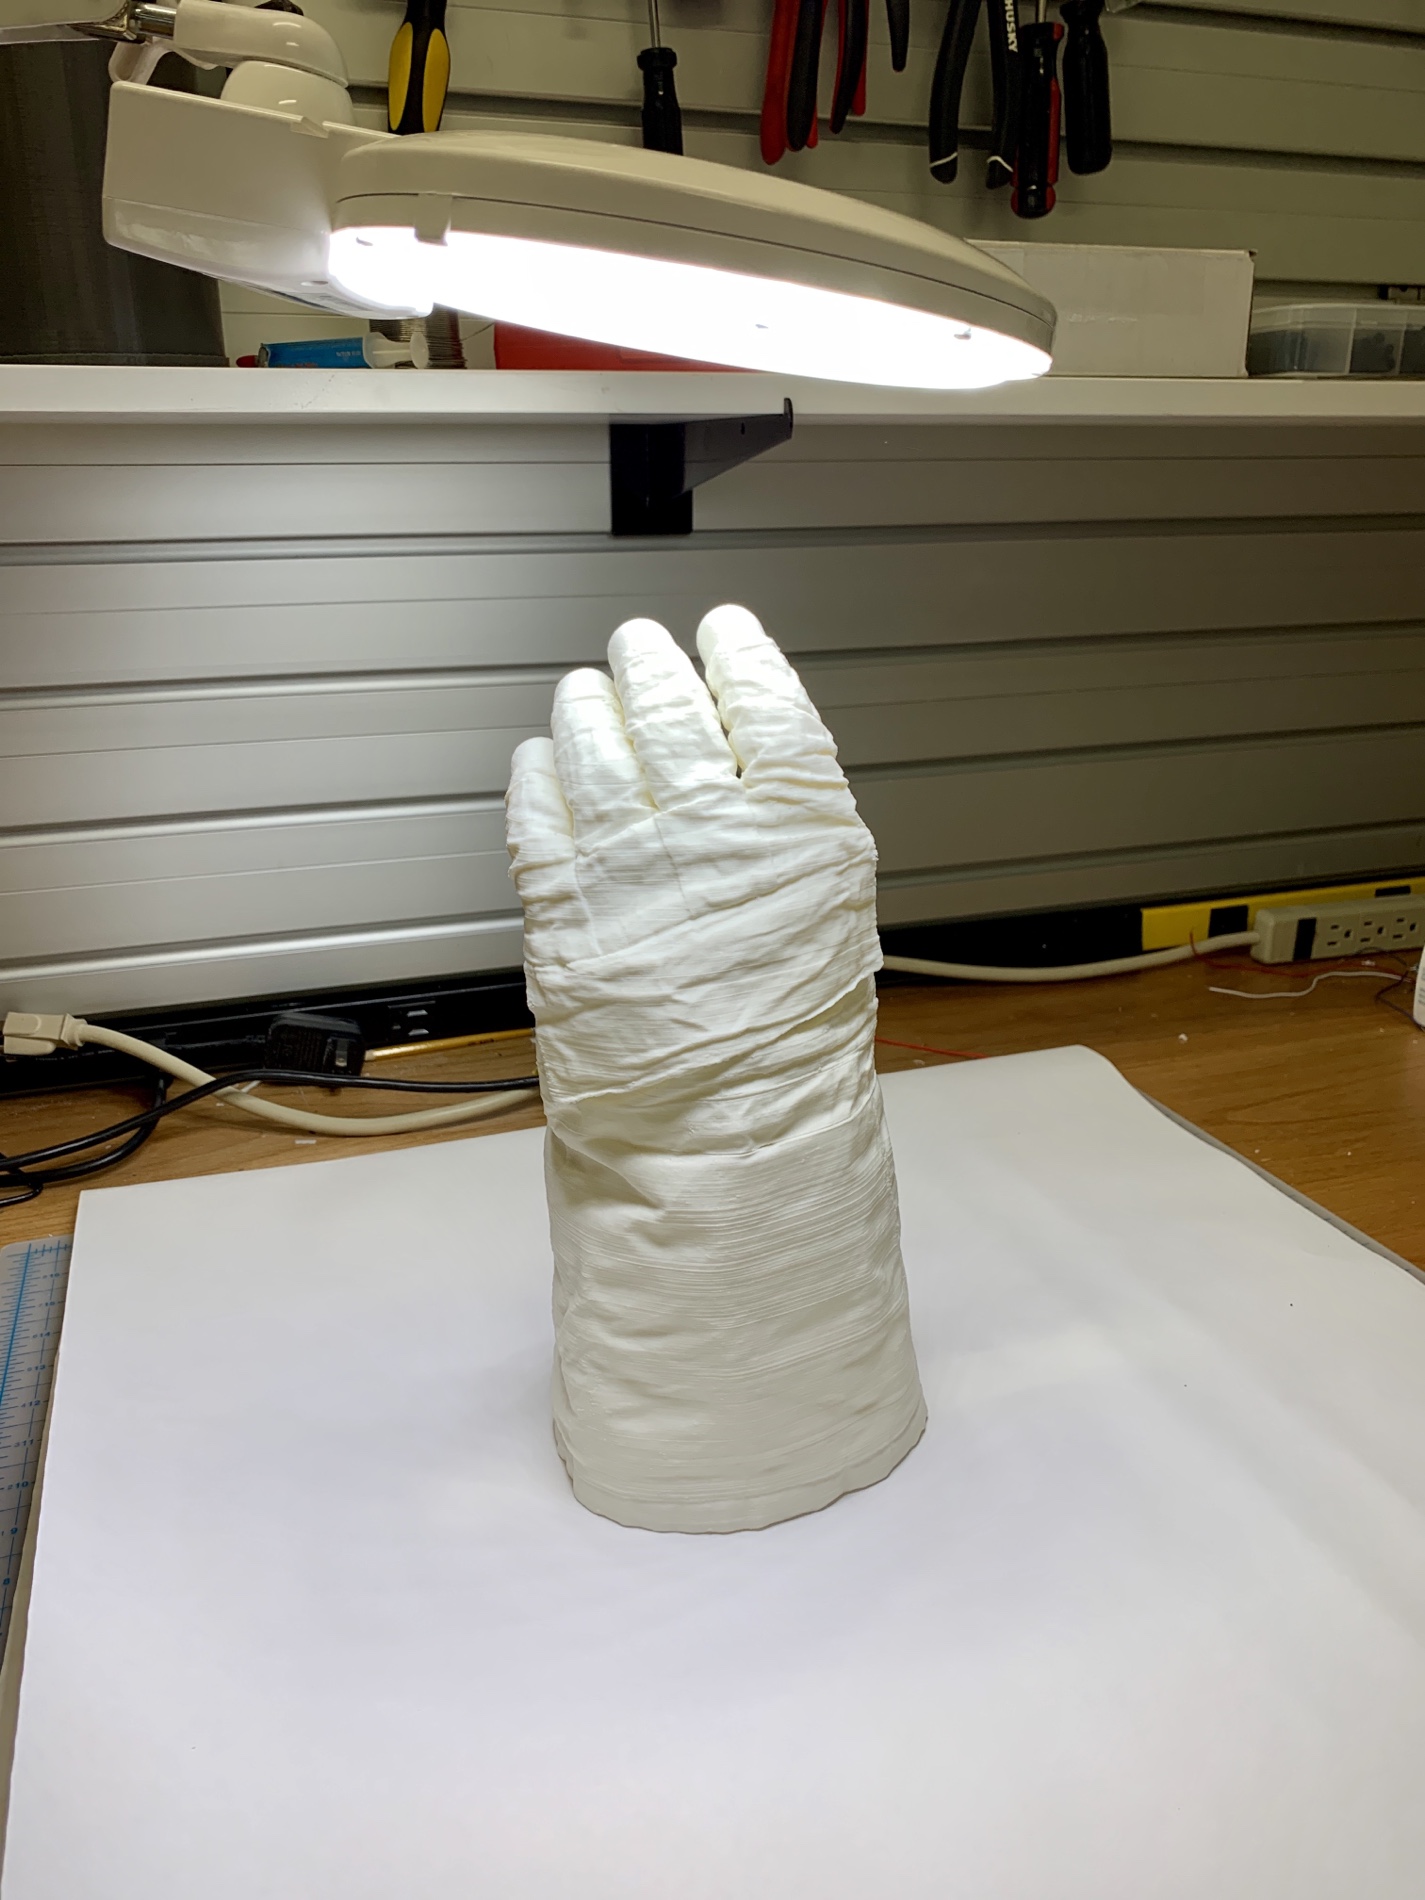
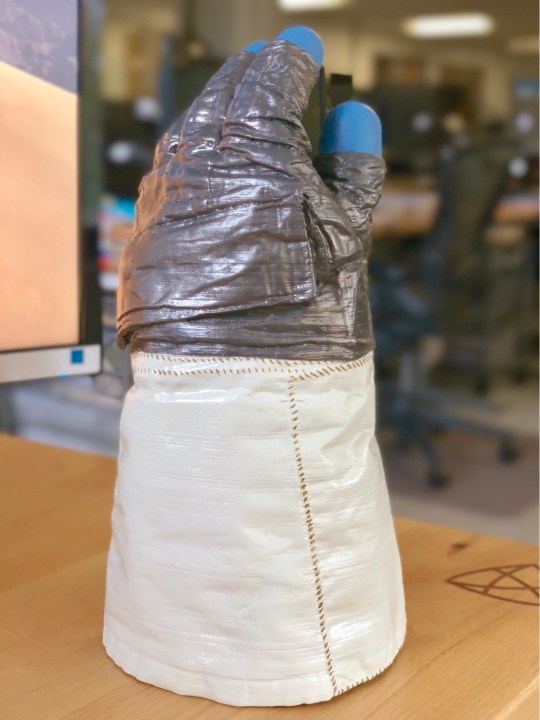
The finished glove
In total I spent approximately 18 hours (excluding 3D printing time which took about 48 hours) in creating this Luna Spacesuit Glove replica. With some minor compromises on quality (sanding and painting), I was able to complete the project on July 16th, 2019. Exactly 50 years after Apollo 11 lifted off Cape Canaveral.


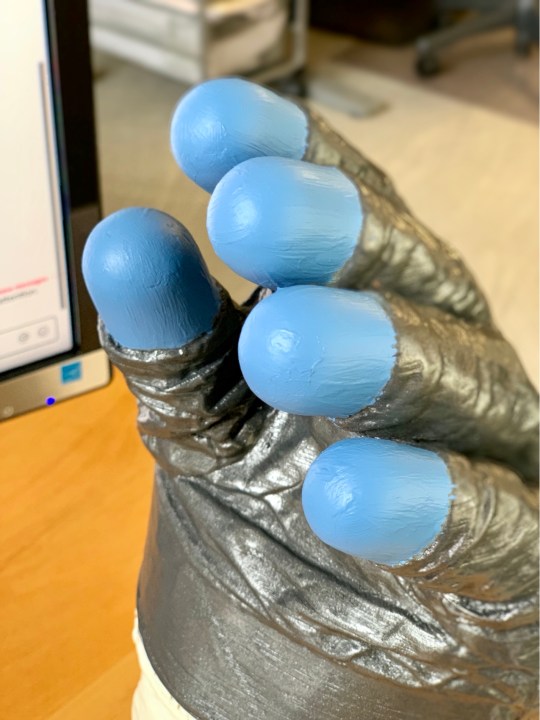
Not enough purple in the color to match the photo 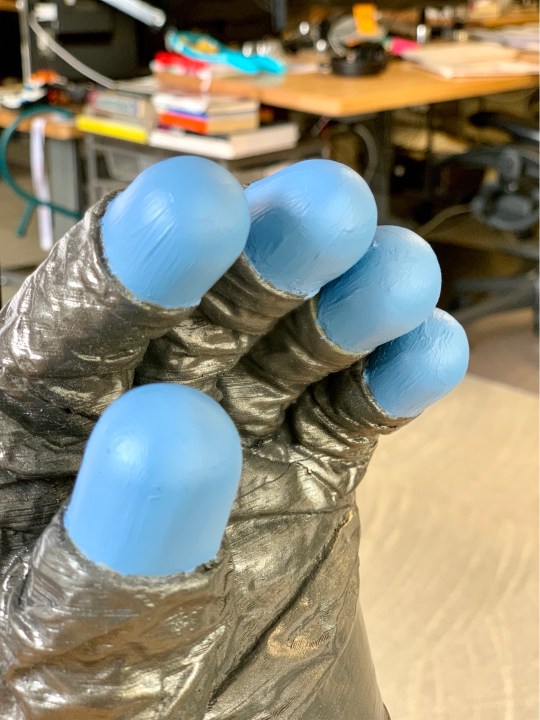
Brush strokes are clearly visible
The Lessons Learnt
- Use finer layer when printing. Instead of 0.2mm layer, a 0.1mm layer will provide much smooth finished surface and require less sanding in general. However this will double the print time and risk printing trouble.
- Use more “natural” color filament. A light gray filament would decrease the likelihood of being misled on how smooth the printing surface is until primed.
- Budget more time for sanding and filling. I could have easily spend 2x or even 3x more time on preparing the surface for painting.
- Use airbrush for the fingertips. This would ensure an uniform finish with ease.
The unsung hero
Having watched plenty of YouTube videos on painting (for example Adam Savage’s Tested), I knew I need some kind of holder/stand to hold the glove while I spray painted. Fortunately I have an old iPad stand that barely survived the cross-country move I can repurpose.
Resting the glove on the stand allowed me to paint all around without having to move the glove. I moved around it instead. The stand also allowed the glove to dry outside without a need to place it on the ground and risk being accidentally touched by visiting feline!

The Credits
My thanks to:
- The Smithsonian Institute for providing the 3D models.
- productOps for allowing me to use their 3D printer and lab space for my hobby project
- My co-worker Eric Fultz for 3D printing advice
- Chris Bensen for pointing me at the right direction for 3D printing glue
- My wife Leah for putting up with all the spray cans, paints, fumes.

This is a great post thankss
LikeLike